Monday, December 13, 2010

Surface test

Okay, so this is a surface test for a new project I'm working on. So it's the sphere and the dress that we're looking at (I'm still deciding on how I'm going to approach the skin surface).


I'm trying to get a pencil crayon type style happening. I've modified how the shading works, all of the surfaces are flat colored surfaces, then it's being shaded by a black pencil crayon, the shadow that is being cast is also pencil crayon. The background right now has nothing fancy going on it's just a simple lambert shader.

Friday, November 19, 2010

Working on Blade

Been awhile since my last post, I've been working on a couple of projects Blade here is near completion, just some surface tweaks, fix some hair render issues, and rig him so I can do some decent posing.


The goal behind this piece was to utilize the new and old feature sets found in Zbrush 4 (released back in September). So most of the meshes were created (and then retopoligized for a more animation friendly meshes) in Zbrush. Also all the sculpting, texturing, and UV layouts were done in ZB.

Maya was used to create the ammo mesh, straps and buckles, lighting and rendering. I'm also rigging him up in Maya and will create a mini environment to showcase the model.

Monday, June 14, 2010

Character Test


Here is a 5 day character test I did last week, 6k poly, 1 image map 1024x1024 resolution.

I choose the subject matter because you don't see very many Muslim woman who are not a stero type in games, and it's a contrast to the standard semi nude hot gun chick type characters that are the norm.

The character isn't lit, it just has an ambient occulision map built into the texture, over the next couple of days I'll take a couple of hours and throw a spec, normal and some lighting in there.

Thursday, May 27, 2010

Monica Bellucci


Monica Bellucci played Persephone in the Matrix trilogy parts 2 and 3 she's an older actress in her 40's. So her photo's tend to be a higher contrast with some Vaseline on ye'ol camera lens. An effect that I tried to simulate with this lighting. From the thumbnail she should look younger but when you blow up the picture you should be able to see some of her age reflected.

This head was a pure a sculpt done in zbrush, meaning I had never lined up any photos to model just eye balled everything, which was more of an exercise in modeling. The skin was also done purely hand panted using no photos.

I've taken this one about as far as it will go I think, there are always things that you want to tweak and make better, but I'm going to put this one in the done pile.

okay, maybe I ninja'd an update...

Nailing down the lighitng


So this will be pretty much the lighting I'm going with. However I had made some changes to the geo and turned off a fill light by accident, which really impacts the lower half of her face. So I will update it tomorrow with some tweaks. I think I may have hit a weird switch or something because the render times have shot through the roof.

Skin, you can tweak skin forever, so many variables and image maps to construct it. Female skin is so much softer too. The skin for Olmos was easier I think (however with what I learned from this skin I wouldn't mind going back and fixing his up some).

Friday, May 21, 2010

And I scrapped the hair yet again

So I just wasn't feeling the hair at all, so I scrapped it all and just used Maya hair.

She's pretty much done now, I'm sure I'll be tweaking the hair more, and the skin shader, and the lighting. And the lips I would like them a little glossier.

So I have two lighting setups, really the only difference is the back-light from the camera left. MSN/Comment on which you think is better :).


Friday, May 14, 2010

Pretty close to where I want her

So I had some issues with Maya crashing when rendering out my scene, it had to do with the displacement node creating a new render engine and then hair crashing maya out because there was a new render engine.

So I have my model close to done, most likely some modeling tweaks here and there but no major reworks. Some skin shader tweaks also, tho I think you can tweak skin forever and day. I'm happy with how the skin turned out as it was my first hand painted skin. So right now it's my low bar and high bar I guess.

Tweaks I'm going to hit, is the eyebrows, the nose nostril area and the bridge area. The normal map may be reading to harshly right now, making some things look a little too sharp, which is the reverse of the problem I was having before where none of the details were really showing up that well.

Any guesses to who she is? Send me an MSN or post a comment :).

Saturday, May 8, 2010

Not much for the long hair

So here is the current state of the head, eyebrows and eyelashes have thickened up. I'm trying to age her up a little also. I've added some new details to the texture.


I'm definitely no hairdresser... Bellow is several hair styles I had gone through and rejected. With long hair I'm finding it's freaking tricky to control all the strands of hair, and most tutorial methods I've seen are shown with really short hair...

So this method was a fail because the hair just didn't seam grounded to the head, the weird kinking on the her right side was an easy fix, but the feel of the hair was wrong. So I scrapped it.


Hair Helmet anyone?


Again these hairstyles are the rejects and I'm just posting my process and problems I'm facing...

Monday, May 3, 2010

Eyelashes and Eyebrows

Added some eyelashes and eyebrows.

The eyelashes on the right eye could use some more tuning, maybe clump both a little more and make them longer.

The eyebrows are close to where I would like them, I can't seam to find where to adjust the translucency on the hair of the eyebrow tho, which I think would help it.

I have a feeling that the eyebrows and eyelashes are going to be constantly tweaked...

Thursday, April 29, 2010

Skin Deep


So I've added some spec maps to the face, and cleaned up some issues I didn't like in the texture. The color on the ears is still a little off, it's the back scatter map I think. I have the feeling I'm constantly going to adjust the 6 texture maps that make up the skin shader until this project is done. I'm liking the overall look however.

I'm hoping to add some eyelashes and eyebrows next. Eye liner looked weird without eyelashes so that's not in the texture yet.

I don't like Ed's skin shader very much, think I may go back and adjust after I'm done this project.

Wednesday, April 28, 2010

Another new one


Just started this head the other night. I just started the skin about 4 hours ago, I think it's coming along, little yellow on top of the forehead. There is pretty much zero spec on face right now, because it's a WIP and I still have to create those maps. The skin so far is entirely hand painted.

Right now there is Zero poor detail and very little other details like moles, wrinkles etc. Also she's not wearing any makeup.

Tomorrow I will create some spec maps, fine tune the texture, fix some modeling things that are bugging me, and add in details.

Sunday, April 18, 2010

Playing with zbrush renders

So, I've been zbrushing this week, working on hard surface modeling by doing some tutorials. I've been improving zbrush renders, fix the bad lighting, improve the existing shaders by tweaking material values, etc... So I've redid the renders on some fast sculpts.

I think this zbrush render looks a lot better than the first Sanjuro, I was using an older file too, so you'll notice there's some more detail too, hehe.


So the next thing I need to do in terms of rendering, is figure out how to add multi-materials into the shader, so i can seperate the hair and skin.


This is just another render of the Downey head, with the skin material I was tweaking.

Monday, April 12, 2010

Fast Sculpting Robert Downey Jr. part deux


So I kicked in another hour on the Downey head, added a goatee and cleaned some stuff up. The key images I was using for a face pose had a furrowed brow, but I decided to give him more of a neutral brow line in the end and adjusted the eye shape accordingly. I kept the smirk tho.

Detailed the hair and gave him a goatee. I'm not going to take this sculpt any further. Total time was about 6 1/2 hours.

Fast Sculpting Robert Downey Jr.

So here is a fast sculpt of Robert Downey Jr. I'm not entirely happy with it, a big part of Downey is his eyes, he's got fairly large eye lashes that help open them up. Also I don't have him with any stubble or facial hair which is a big part of his likeness. I think I'll throw about another hour on him today and clean up the shirt, and maybe add some facial hair.

Here is the progression of his sculpt;


Just about Final, shirt needs detailing and maybe some facial hair.
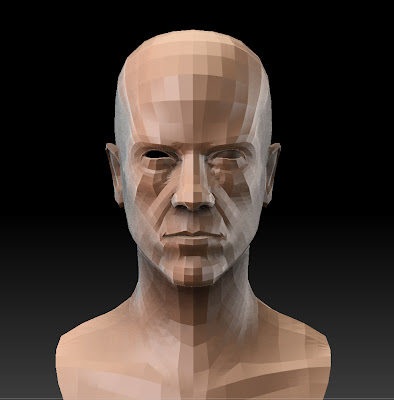

Base mesh roughed into his head shape.
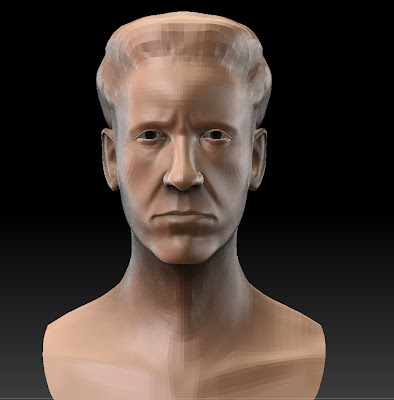

Subdivided the mesh twice, refined his features. Added pupils to his eyes to help shape the eyes. Here his eyes are too small and beady, there also to far apart. Shape of the head is too long.
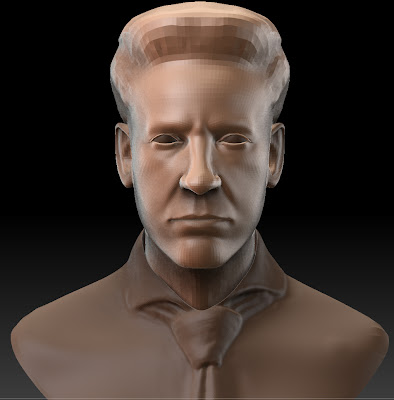

Changed up the head shape, subdivided the mesh one step. Here I added the shirt, the geo I extracted from the base mesh.
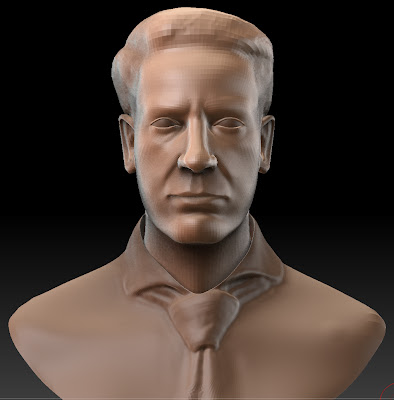

So more shaping of the head here, started forming the hair a little better and added some asymmetry to the model.
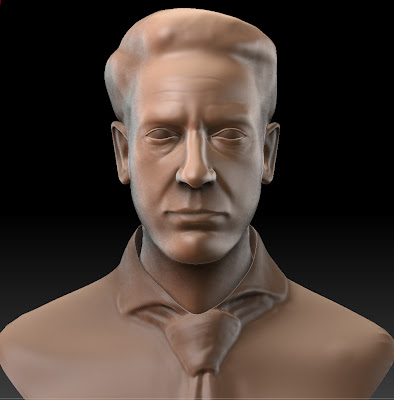

Subdivided the mesh even further and started adding wrinkles, continually tweaking the head shape and eye shape through all these steps.


This is where the mesh is at now, started HD sculpting (further subdivision of the mesh) for added wrinkles and pores.

Fast Sculpting Sanjuro

Sanjuro is a wandering Ronin, made popular by the movie of the same name by Akira Kurosawa.


So the modeling took about 5 hours and then I had tweaked it as I did the texturing which took about another 3 to 4 hours. So basically a one day head. This texture is all hand painted which is my second attempt at a non photo projected surface.

I started his clothing and spent about a 1/2 hour on it so far, he has his hands tucked into his shirt (must be a Samurai thing). I haven't decided if I am going to continue with this project. If I do it will be a strictly Zbrush project that will be the entire character posed, as his clothing should be fun. There are some things I don't like about the head, like his top lip, positioning of the ears, the lower eye lids, ear is pretty lazy too :p.

It's late I'll post more tomorrow for the one or two people who actually check my blog...

Fast Sculpting Dr. Horrible

Okay, so I've been banging out some fast sculpts. Basically a fast sculpt to me, is a head that takes about 1 to 5 hours depending on what I'm doing. Some fast sculpts may turn into a future project, the overall object is achieve a likeness of the character then forget it and move on to another project. Most fast sculpts are not textured.


This is Dr. Horrible a character played by TVs very own Neil Patrick Harris. Kind of a campy fun fella. I like where this sculpt went and I'm going to continue with this project. I haven't sculpted in the hair here on purpose and will most likely be reshaping the top of his head as it may be a tad too large :D.

So this sculpt took me about 3 1/2 hours to get to this point and about another half hour for his clothing (geo was extracted from the head mesh as a starting point). I spent about 2 or 3 hours sculpting the goggles however I scrapped them and built a mesh in Maya (not seen here).

Ya, okay it's been awhile

Been awhile working on lots of different things in Zbrush, been trying to get the hang of hard surfaces. I'm finding it easier to lay down a base mesh in Maya and bring it into Zbrush when dealing with non organic objects.

While the technique of grabbing a ball and mushing it around to create a sculpt can yield pleasant results I'm finding that the line flow ends up sucking and you kind of fight with the surface a lot. So you then do a retopology of the surface, but at that point why didn't I just whip up a quick base mesh to start...


So this model is the start of a halfling warrior. The armor was extracted off the surface of his body, and then I used different polishing brushes to harden up the surface. If you look at the piece of armor on the top of the shoulder its warping a bit and isn't totally flat where I want it totally flat. I'm thinking if I retopo it I can control the line flow better to the edging that I want to achieve.

His skin texture was my first effort at hand painted skin (the eyebrows were projected from a photo and looks like poop :p). The best CG skin I've seen uses the hand painted technique, so I'm gonna learn it :). His head is too wide right now, which is an easy fix.

So I have about 3 days invested in this character, (there's a body and a lot more armor). However the design for his armor sucks and the head is meh, so scrapping this guy. I will revisit the idea after I find a decent armor design. If you have any decent armor designs please drop a comment or MSN me.

Wednesday, February 10, 2010

Light Penatrates the skin

So, this update is subtle but is going to help me with other stuff. I was working with some different lighting schemes for different angles and more dramatic type lighting, but the way the skin was absorbing the light I didn't really like it.


If you look under the nose of Ed here you'll see that the shadow is a lot more darker now, which is actually correct since I don't have any lights hitting that spot so it should be pretty dark. His eye area and surface detail are also now getting blown out as much. I also added some other maps to the shader to control the light and bring up the detail some. This is my first skin shader that is not a blinn with 3 maps for a video game so I'm learning as I go :).

Tuesday, February 9, 2010

Talk about a hairy situation...

So I had a good weekend, my little girl came down for a visit on Friday for the weekend, always a good time when the brat is about it :).

Talk about a hairy situation. So this girls hair I'm finding waaaay tougher than Olmos's hair. Right now I'm using maya hair to do this and it's giving me mixed results all over the place. Basically I set up a simulation to get the hair falling on the head right, but some curves are fighting me tooth and nail, like the bludge on the left side of her head (camera right). The top of her right side is also bulging up too much it should be flatter.

The bottom of her hair I haven't really worked on yet, it's going to require a new simulation as thickness and color that's required I can't really get with one Maya hair setup.


I'm finding it hard to find a good tutorial on making hair, I watched one by digital tutors but it was more about using dynamics and not actually creating nice hair. The 10ish minute example on creating a actual head of hair for a model was poorly done and did not look good at all (the picture of the redhead on the web page isn't in the video). That being said it did have some new ideas in it, and I did learn somethings just not what I really wanted to learn, if you have a library around sign it out.

So in short still lots of work to do on the hair... Never liked hair really, takes me months to get a hair cut.

Wednesday, February 3, 2010

Well Momma didn't raise no hair dresser...

So did some revisions to the girl head and started a different approach on hair. Basically I started with nurbs planes and sculpted out hair cards, then I extracted the curves and populated the entire head with hair. This method was a lot faster than Ed's hair where I had individually placed each hair clumb and then shaped the key strands.

However will this be a better technique? Right now this image is just a straight up raw extraction from the planes, and we see two things;


1. The hair needs a lot of work and
2. I am noooooo hairdresser.

I will play with dynamics and see if I can get the hair to settle on the head and fall along her neck better, if that doesn't work, well... I'm in for a heap of work.

Again this is a WIP (Work in Progress) Image and in no way represents the final head and hair.

Tuesday, February 2, 2010

Adding Insignias


Added texture to the uniform, his shoulders I'm not quite getting the feel of the fabric yet. My maya file corrupted and I lost some work :(, but I had a back up so... I just had to redo some stuff.

I can't find a clear enough image of the insignias on his collar there, it has some design in it, so if anyone is in to that kind of stuff (I promise I won't call you a fan boy) and could point me in the direction for some good reference please give me a shout (there is a wiki for all the patches and stuff, but it didn't cover his collar). And the buttons were lost in the crash, I'll have to remake those.

Friday, January 29, 2010

Lighting it up


Uniform model has been added, but not textured yet! So please no freak outs on the colors and the shader of his uniform (I haven't even laid out the UVs yet). Also it's a little snug around the neck so Going to shape that out a tad bit, shoulders are also curving off too much but that's an easy fix.

So working on lighting the face, 4 lights right now and render times are up to 15 minutes a frame, I took one of the lenses out of his glasses (back lense) but think I may throw that back in, I liked the reflection of the light reflectors in it. And I think I may throw in another light reflector in front of him to give his eyes more life.

Anyone have any thoughts on the specularity of his face? To specy?

Wednesday, January 27, 2010

For the fan boys


Alrighty made one quick adjustment for the Adama fan boys before I could get called out on it :). What was the change? Only a fan boy would know :P.

Looks like I have to watch the lighting, the wrong angle totally kills his pock marks.

And I put on the glasses...


Due to popular demand, the glasses are on, begging the question, "Is the uniform to follow?". I enlarged his pupils after looking at photos he has less white space in the eyes as I had. Brought in the sides of the head a tad to fill up the hairline. Oh and added crappy eyebrows, ya... I'm gonna have to redo those, Maya fur just isn't working for me at this point. He could most likely benefit from a eccentricty map and a specular reflection map as well.

But he's getting close to finish, oh and i should fix up his lighting it's flat right now, had it this way to help me work on hair.


Okay, so did another quick render didn't work out so I combined it with the on up top to fake some sort of eye highlight, and brought the saturation down. Looks like the light is penetrating to far into his skin along the shoulder so I'll have to dial back the light, or change up the subsurface scattering map.

Wednesday, January 20, 2010

Shave and Hair Cut....


Yup, hair sure is tedious, takes awhile to render too, tho my settings are a little high. So have the hair plugs in (most of ehm), and now I just have to shape the hair line add body to where it's needed etc. It needs a lot more work.

His chest texture is going to remained smudged until I can find a good head/neck texture somewhere, if you have one please MSN me :). I think I need to revisit his forhead wrinkles they look to thick to me. That will be in the polish stage. I would like to have the hair done tomorrow with the eyebrows under way.

Tuesday, January 19, 2010

State of Ed


Adjusted the skin tone and lighting, adjusted some modeling, fixed a problem with the spec map pointing to the wrong spot.

Not a 2am - 3am Post

Man I post a lot late a night, any who this is where my head is at...


Will start on the hair soon, gonna switch back to Edward and fix his hair up, and give him eyebrows. I don't know any artist who likes doing hair, tedious and hard :p.

Overall she's coming along, I think I could stand to make her mouth a little smaller, and up around her eyelashes it's kinda smudgy.

Sunday, January 17, 2010

Seek the shader!


Set up the skin shader, I'm using a lot more maps this time and found some errors in the Olmos shader, hehe. The eyes aren't fitting atm, so I'm going to have to fix that... The modeling isn't finished at all, I just worked on the shader pretty much today, defined the neck area better.

Saturday, January 16, 2010

Textured cleaned, guess I should do the same to the house...


So I cleaned up the texture, touched up some modeling. Right now the texture and model is pretty symmetrical so I'll add some asymmetry tomorrow or the next day. This is still being rendered in zbrush so that kinda blows out all the detail in the texture atm. I'm also going to have to add in the fine details over the next bit too, flesh out the neck and chest area as it's pretty flat.

Friday, January 15, 2010

Windows 7 networking is easier?


Bah, spent most of my time today trying to get my notebook and desktop to talk to each other. They still don't really, I've narrowed it down as either windows 7 networking sucks or Bitdefender my firewall does... Anyways.

So I started with the texutre on her face, I can't find any hires images of who I'm doing, so I had to lay down a highres skin texture from a different female model all together. As you can see stuff isn't lining up, like the nostrils, eyebrows, eyes, just the mouth so far. And the texture has a bunch of light patches and streaks and projection errors. But I'm posting because this is a wip, so :p.

Don't the grey eyes look eerie? You can have a lot of weirdness on the human head, but mess with the eyes and it all goes to pot :).

Thursday, January 14, 2010

Other work

Just started modelling a new head, a girl... way different than Ed there :).

Saturday, January 9, 2010

Rip into it

Okay, holidays are officially over and the plague that I contracted in Edmonton seams to be abating and I can breath now, tho I'm still holding my breath for some reason (This is all literal btw bad cold, couldn't breath through my nose at all).


I still have a list of stuff I want to fix, but I think it's hammer at the head time, so rip into it, MSN your feedback.

The eyebrows are going to be done with maya fur, so that is the last thing I'm going to work on, right now they're just place holders, until I get the geo locked down. Same with the skin poor details, they'll be added when the modeling is hammered down, right now just some surface noise.